


 Have you ever driven down a country road and seen a unique mailbox? One that is made to look like an animal, or a tractor, or maybe a piece of machinery that represents the owners business or interests? Throughout the years I’ve spent driving around places I’ve seen some pretty cool mailboxes. This year, after the snowplow threw some wet snow and broke my post off and possibly a piece of tillage equipment grazing the box, it was time for a new mailbox. I told my wife I would replace it if she let me make a “sweet arrow mailbox post.” She rolled her eyes and said “whatever.” That’s as good as a yes in my book.
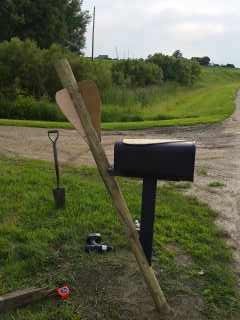 With the extended holiday weekend approaching, we gathered a few supplies. She found a new in box mailbox at a garage sale for a couple dollars, and I bought a treated fence post at the lumber yard. I also spent about five dollars on spray paint, so total investment in this project was just under $15. Looking back it would have probably been better to build everything and then set it in the ground, but what’s the fun in that? I started by removing the old mailbox and digging a new hole for the new box. Since this post is set at an angle, I needed to move the hole closer to the road to keep the mailbox in the same general area.
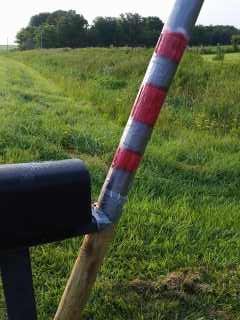
 After I set the post, I cut a piece of 2×6 to hold the mailbox from my random board stock. I used a scroll saw to cut a semi-circle in the post end so it would be easier to fasten to the upright. After some fine tuning on fitment, I was able to put a couple temporary screws in so I could measure and fit the box support. I found a nice piece of 2×4 in the random board stock that would work nicely. After making sure my angles were correct to fit everything together nicely, I pre-drilled mounting holes and screwed everything together with 3” deck screws. Now that I had the basics covered, it was time to figure out how to make the post look like an arrow.
 I dug up a scrap piece of ¼” plywood and roughed a freehand vane shape on it with a marker. I cut it out and traced it two more times to give me three vanes. After I had them cut, I clamped them together and ran them on a belt sander to make them uniform, then hung them up and started painting them.
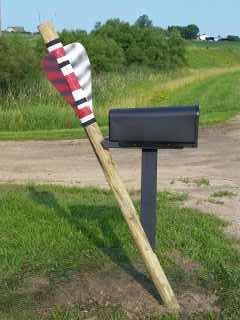
While they were drying, I took a circular saw to the post and made two cuts with 1/8” gap between them where the vanes would go. Since I don’t really have the right woodworking tools, I finished cleaning out the grooves for the vanes with my pocket knife. They are pretty rough, but they serve their purpose. I masked off the vane area with some duct tape and sprayed the end with white paint. 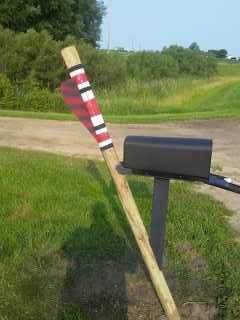 I let that dry overnight and the next morning I masked off some cresting stripes and painted them red and black. I fit the vanes into the post and secured them with some finishing nails and Gorilla Glue.
The DIY Archery Mailbox was a pretty quick and easy project that was cheap and fun to build. It isn’t the nicest thing I’ve ever built, but I do like how it turned out, and now everyone that drives by will know for sure the guy that lives there is a full blown archery nut.